Tuesday, March 15, 2022

Prevent open redirect attacks in ASP.NET Core

 A web app that redirects to a URL that's specified via the request such as the querystring or form data can potentially be tampered with to redirect users to an external, malicious URL. This tampering is called an open redirection attack.

Whenever your application logic redirects to a specified URL, you must verify that the redirection URL hasn't been tampered with. ASP.NET Core has built-in functionality to help protect apps from open redirect (also known as open redirection) attacks.

What is an open redirect attack?

Web applications frequently redirect users to a login page when they access resources that require authentication. The redirection typically includes a returnUrl querystring parameter so that the user can be returned to the originally requested URL after they have successfully logged in. After the user authenticates, they're redirected to the URL they had originally requested.

Because the destination URL is specified in the querystring of the request, a malicious user could tamper with the querystring. A tampered querystring could allow the site to redirect the user to an external, malicious site. This technique is called an open redirect (or redirection) attack.

An example attack

A malicious user can develop an attack intended to allow the malicious user access to a user's credentials or sensitive information. To begin the attack, the malicious user convinces the user to click a link to your site's login page with a returnUrl querystring value added to the URL. For example, consider an app at contoso.com that includes a login page at http://arjunwalmiki.com/Account/LogOn?returnUrl=/Home/About. The attack follows these steps:

  1. The user clicks a malicious link to http://arjunwalmiki.com/Account/LogOn?returnUrl=http://arjunwalmiki1.com/Account/LogOn (the second URL is "arjunwalmiki1.com", not "arjunwalmiki.com").
  2. The user logs in successfully.
  3. The user is redirected (by the site) to http://arjunwalmiki1.com/Account/LogOn (a malicious site that looks exactly like real site).
  4. The user logs in again (giving malicious site their credentials) and is redirected back to the real site.

The user likely believes that their first attempt to log in failed and that their second attempt is successful. The user most likely remains unaware that their credentials are compromised.

Open Redirection Attack Process

In addition to login pages, some sites provide redirect pages or endpoints. Imagine your app has a page with an open redirect, /Home/Redirect. An attacker could create, for example, a link in an email that goes to [yoursite]/Home/Redirect?url=http://phishingsite.com/Home/Login. A typical user will look at the URL and see it begins with your site name. Trusting that, they will click the link. The open redirect would then send the user to the phishing site, which looks identical to yours, and the user would likely login to what they believe is your site.

Protecting against open redirect attacks

When developing web applications, treat all user-provided data as untrustworthy. If your application has functionality that redirects the user based on the contents of the URL, ensure that such redirects are only done locally within your app (or to a known URL, not any URL that may be supplied in the querystring).

LocalRedirect

Use the LocalRedirect helper method from the base Controller class:

C#
public IActionResult SomeAction(string redirectUrl)
{
    return LocalRedirect(redirectUrl);
}

LocalRedirect will throw an exception if a non-local URL is specified. Otherwise, it behaves just like the Redirect method.

IsLocalUrl

Use the IsLocalUrl method to test URLs before redirecting:

The following example shows how to check whether a URL is local before redirecting.

C#
private IActionResult RedirectToLocal(string returnUrl)
{
    if (Url.IsLocalUrl(returnUrl))
    {
        return Redirect(returnUrl);
    }
    else
    {
        return RedirectToAction(nameof(HomeController.Index), "Home");
    }
}

The IsLocalUrl method protects users from being inadvertently redirected to a malicious site. You can log the details of the URL that was provided when a non-local URL is supplied in a situation where you expected a local URL. Logging redirect URLs may help in diagnosing redirection attacks.

Saturday, March 12, 2022

Python Comments

 Comments can be used to explain Python code.

Comments can be used to make the code more readable.

Comments can be used to prevent execution when testing code.

Creating a Comment

Comments starts with a #, and Python will ignore them:

Code :-

#This is a comment

print("Hello, World!")

Comments can be placed at the end of a line, and Python will ignore the rest of the line:

print("Hello, World!"#This is a comment

A comment does not have to be text that explains the code, it can also be used to prevent Python from executing code:

#print("Hello, World!")
print("Cheers, Mate!")

Multi Line Comments

Python does not really have a syntax for multi line comments.

To add a multiline comment you could insert a # for each line:

#This is a comment
#written in
#more than just one line
print("Hello, World!")

Or, not quite as intended, you can use a multiline string.

Since Python will ignore string literals that are not assigned to a variable, you can add a multiline string (triple quotes) in your code, and place your comment inside it:

"""
This is a comment
written in
more than just one line
"
""
print("Hello, World!")

As long as the string is not assigned to a variable, Python will read the code, but then ignore it, and you have made a multiline comment.


Create your first Angular 6 app

Angular 6 is a JavaScript framework, created my Misko Hevery and maintained by Google. It’s an MVC (Model View Controller). 
Prerequisites:
  • Node.js
  • npm
npm (node package manager) is installed with Node.js
Check the node.js version:
node -v
npm:
npm -v
Angular-CLI
Install Angular-cli:
npm install -g @angular/cli
And finally, you should have:
  • Basic knowledge of JavaScript
  • HTML and CSS fundamentals
You don’t need to have any knowledge of Angular.
Now that we have the environment to run our Angular app, let’s get started!

Creating our first app

We will use angular-cli to create and generate our components. It will generate services, router, components, and directives.
To create a new Angular project with Angular-cli, just run:
ng new my-app
The project will be generated automatically. Let’s create our to-do app!
ng new todo-app 
I am using todo-app app name you can set according to you. 
Then, open the files in your text editor. I use Text editor- visual code, but you can choose any editor.
Here’s what the app structure looks like:

The Python Command Line

 To test a short amount of code in python sometimes it is quickest and easiest not to write the code in a file. This is made possible because Python can be run as a command line itself.

Type the following on the Windows, Mac or Linux command line:

C:\Users\Your Name>python
Or, if the "python" command did not work, you can try "py":
C:\Users\Your Name>py

From there you can write any python, including our hello world example from earlier in the tutorial:

C:\Users\Your Name>python
Python 3.6.4 (v3.6.4:d48eceb, Dec 19 2017, 06:04:45) [MSC v.1900 32 bit (Intel)] on win32
Type "help", "copyright", "credits" or "license" for more information.

>>> print("Hello, World!")

Which will write "Hello, World!" in the command line:

C:\Users\Your Name>python
Python 3.6.4 (v3.6.4:d48eceb, Dec 19 2017, 06:04:45) [MSC v.1900 32 bit (Intel)] on win32
Type "help", "copyright", "credits" or "license" for more information.
>>> print("Hello, World!")

Hello, World!

Whenever you are done in the python command line, you can simply type the following to quit the python command line interface:

exit()

Quick start in Python

 Python is an interpreted programming language, this means that as a developer you write Python (.py) files in a text editor and then put those files into the python interpreter to be executed.

The way to run a python file is like this on the command line:

C:\Users\Your Name>python helloworld.py

Where "helloworld.py" is the name of your python file.

Let's write our first Python file, called helloworld.py, which can be done in any text editor.

helloworld.py

print("Hello, World!")
Try it Yourself »

Simple as that. Save your file. Open your command line, navigate to the directory where you saved your file, and run:

C:\Users\Your Name>python helloworld.py

The output should read:

Hello, World!

Congratulations, you have written and executed your first Python program.


Python Install

 Many PCs and Macs will have python already installed.

To check if you have python installed on a Windows PC, search in the start bar for Python or run the following on the Command Line (cmd.exe):

C:\Users\Your Name>python --version

To check if you have python installed on a Linux or Mac, then on linux open the command line or on Mac open the Terminal and type:

python --version

If you find that you do not have Python installed on your computer, then you can download it for free from the following website: https://www.python.org/

Wednesday, March 9, 2022

Create virtual machines

 Now create the spoke workload and on-premises virtual machines, and place them in the appropriate subnets.

Create the workload virtual machine

Create a virtual machine in the spoke virtual network, running IIS, with no public IP address.

  1. From the Azure portal home page, select Create a resource.
  2. Under Popular, select Windows Server 2016 Datacenter.
  3. Enter these values for the virtual machine:
    • Resource group - Select FW-Hybrid-Test.
    • Virtual machine nameVM-Spoke-01.
    • Region - Same region that you're used previously.
    • User name: <type a user name>.
    • Password: <type a password>
  4. For Public inbound ports, select Allow selected ports, and then select HTTP (80), and RDP (3389)
  5. Select Next:Disks.
  6. Accept the defaults and select Next: Networking.
  7. Select VNet-Spoke for the virtual network and the subnet is SN-Workload.
  8. For Public IP, select None.
  9. Select Next:Management.
  10. For Boot diagnostics, Select Disable.
  11. Select Review+Create, review the settings on the summary page, and then select Create.

Peer the hub and spoke virtual networks

 Now peer the hub and spoke virtual networks.

  1. Open the FW-Hybrid-Test resource group and select the VNet-hub virtual network.

  2. In the left column, select Peerings.

  3. Select Add.

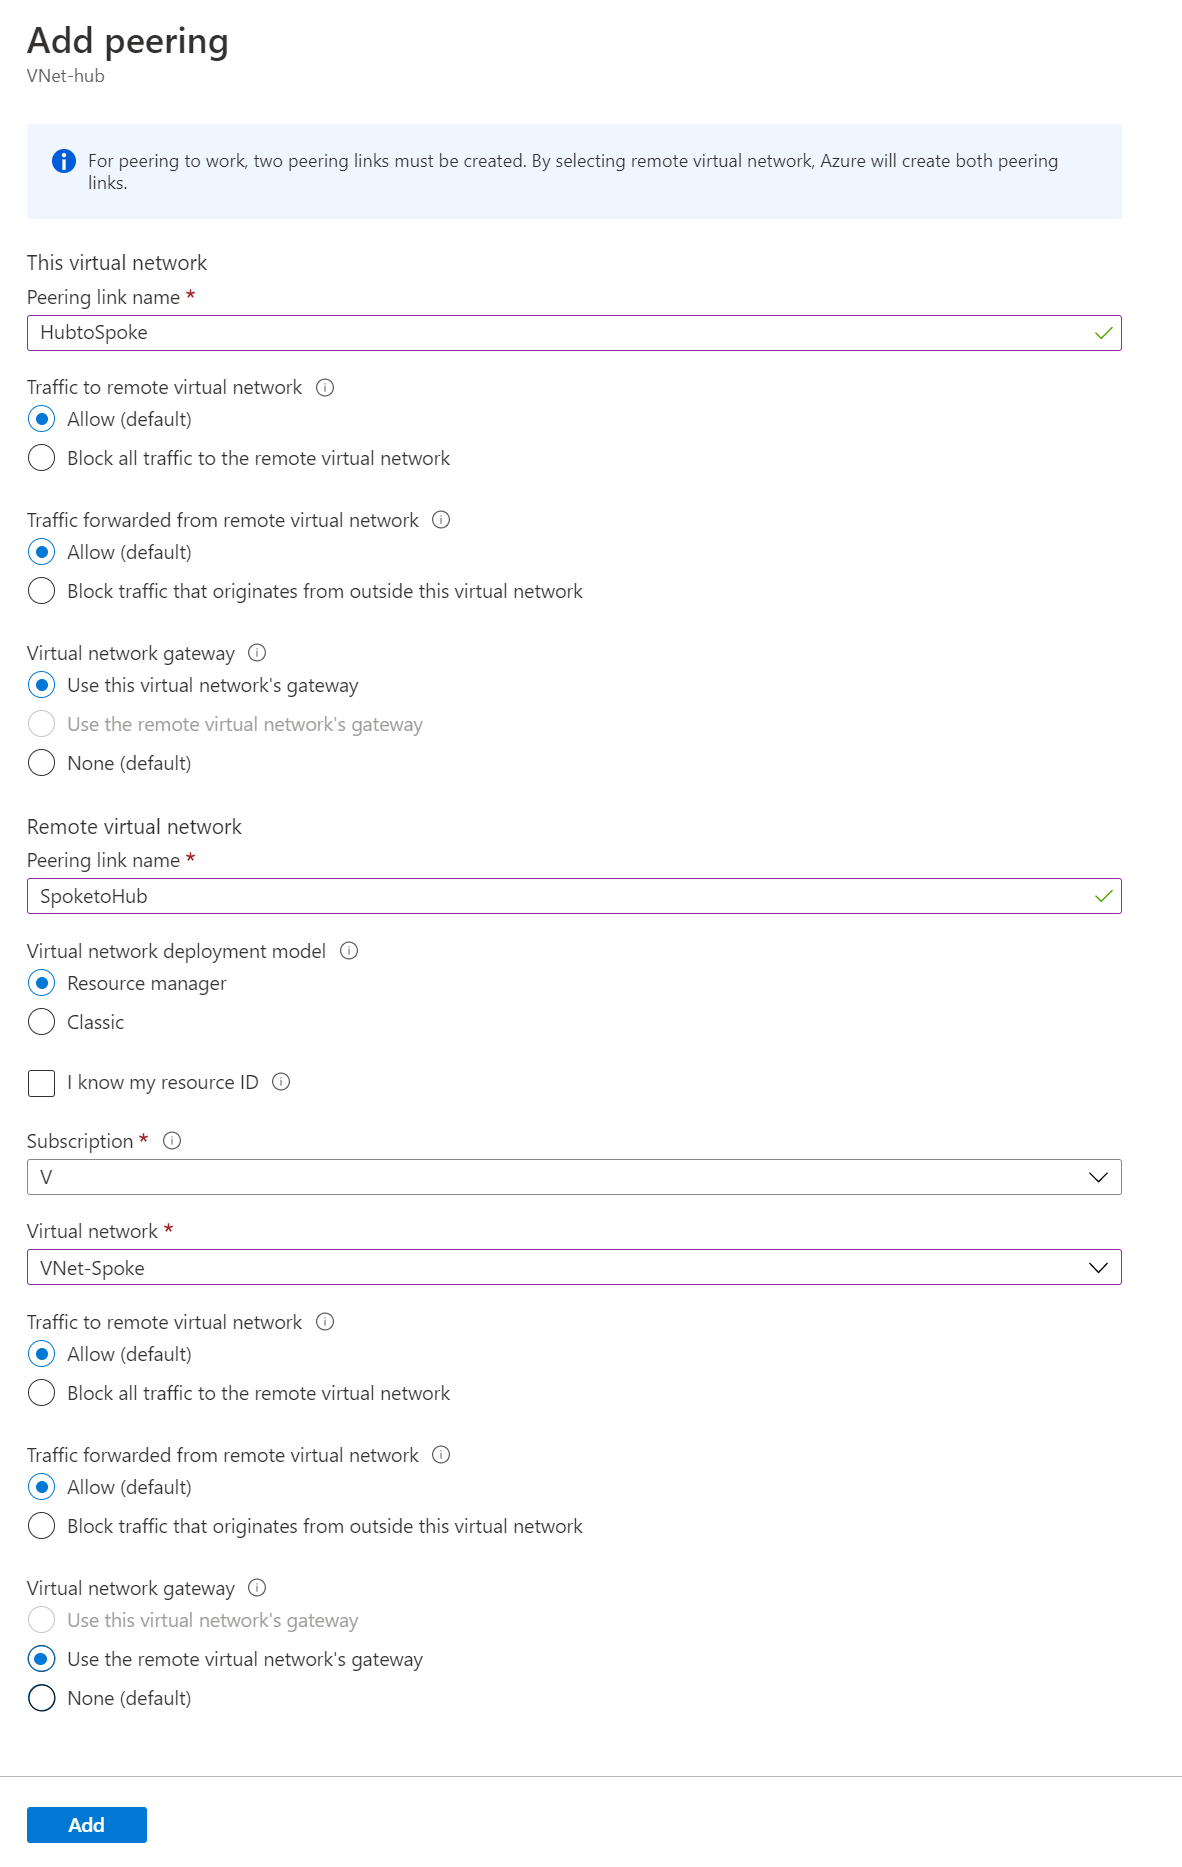
  4. Under This virtual network:

    Setting nameValue
    Peering link nameHubtoSpoke
    Traffic to remote virtual networkAllow (default)
    Traffic forwarded from remote virtual networkAllow (default)
    Virtual network gatewayUse this virtual network's gateway
  5. Under Remote virtual network:

    Setting nameValue
    Peering link nameSpoketoHub
    Virtual network deployment modelResource manager
    Subscription<your subscription>
    Virtual networkVNet-Spoke
    Traffic to remote virtual networkAllow (default)
    Traffic forwarded from remote virtual networkAllow (default)
    Virtual network gatewayUse the remote virtual network's gateway
  6. Select Add.

    Vnet peering

Create and connect the VPN gateways

 The hub and on-premises virtual networks are connected via VPN gateways.

Create a VPN gateway for the hub virtual network

Now create the VPN gateway for the hub virtual network. Network-to-network configurations require a RouteBased VpnType. Creating a VPN gateway can often take 45 minutes or more, depending on the selected VPN gateway SKU.

  1. From the Azure portal home page, select Create a resource.
  2. In the search text box, type virtual network gateway.
  3. Select Virtual network gateway, and select Create.
  4. For Name, type GW-hub.
  5. For Region, select the same region that you used previously.
  6. For Gateway type, select VPN.
  7. For VPN type, select Route-based.
  8. For SKU, select Basic.
  9. For Virtual network, select VNet-hub.
  10. For Public IP address, select Create new, and type VNet-hub-GW-pip for the name.
  11. Accept the remaining defaults and then select Review + create.
  12. Review the configuration, then select Create.

Create a VPN gateway for the on-premises virtual network

Now create the VPN gateway for the on-premises virtual network. Network-to-network configurations require a RouteBased VpnType. Creating a VPN gateway can often take 45 minutes or more, depending on the selected VPN gateway SKU.

  1. From the Azure portal home page, select Create a resource.
  2. In the search text box, type virtual network gateway and press Enter.
  3. Select Virtual network gateway, and select Create.
  4. For Name, type GW-Onprem.
  5. For Region, select the same region that you used previously.
  6. For Gateway type, select VPN.
  7. For VPN type, select Route-based.
  8. For SKU, select Basic.
  9. For Virtual network, select VNet-Onprem.
  10. For Public IP address, select Create new, and type VNet-Onprem-GW-pip for the name.
  11. Accept the remaining defaults and then select Review + create.
  12. Review the configuration, then select Create.

Create the VPN connections

Now you can create the VPN connections between the hub and on-premises gateways.

In this step, you create the connection from the hub virtual network to the on-premises virtual network. You'll see a shared key referenced in the examples. You can use your own values for the shared key. The important thing is that the shared key must match for both connections. Creating a connection can take a short while to complete.

  1. Open the FW-Hybrid-Test resource group and select the GW-hub gateway.
  2. Select Connections in the left column.
  3. Select Add.
  4. The the connection name, type Hub-to-Onprem.
  5. Select VNet-to-VNet for Connection type.
  6. For the Second virtual network gateway, select GW-Onprem.
  7. For Shared key (PSK), type AzureA1b2C3.
  8. Select OK.

Create the on-premises to hub virtual network connection. This step is similar to the previous one, except you create the connection from VNet-Onprem to VNet-hub. Make sure the shared keys match. The connection will be established after a few minutes.

  1. Open the FW-Hybrid-Test resource group and select the GW-Onprem gateway.
  2. Select Connections in the left column.
  3. Select Add.
  4. For the connection name, type Onprem-to-Hub.
  5. Select VNet-to-VNet for Connection type.
  6. For the Second virtual network gateway, select GW-hub.
  7. For Shared key (PSK), type AzureA1b2C3.
  8. Select OK.

Verify the connection

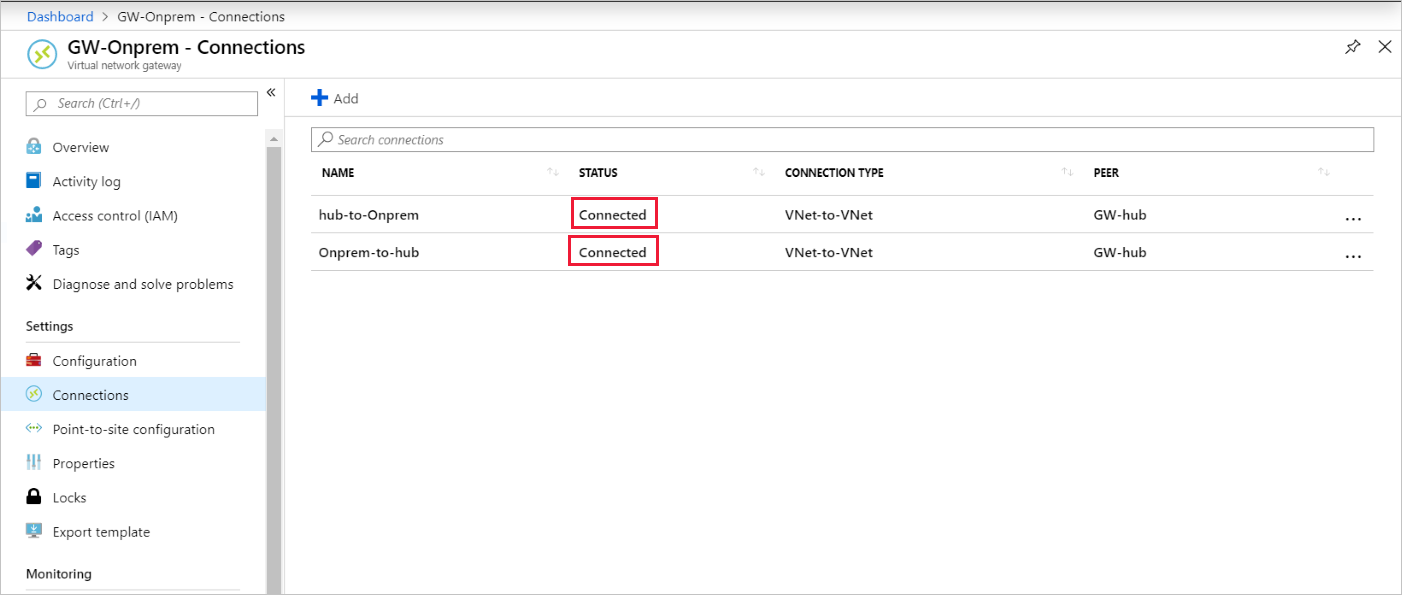
After about five minutes or so, the status of both connections should be Connected.

Gateway connections