Wednesday, March 9, 2022

Create the on-premises virtual network


Create the on-premises virtual network

  1. From the Azure portal home page, select Create a resource.
  2. In Networking, select Virtual network.
  3. For Resource group, select FW-Hybrid-Test.
  4. For Name, type VNet-OnPrem.
  5. For Region, select (US) East US.
  6. Select Next : IP Addresses
  7. For IPv4 address space, delete the default address and type 192.168.0.0/16.
  8. Under Subnet name, select Add subnet.
  9. For Subnet name type SN-Corp.
  10. For Subnet address range, type 192.168.1.0/24.
  11. Select Add.
  12. Select Review + create.
  13. Select Create.

Now create a second subnet for the gateway.

  1. On the VNet-Onprem page, select Subnets.
  2. Select +Subnet.
  3. For Name, type GatewaySubnet.
  4. For Subnet address range type 192.168.2.0/24.
  5. Select OK.

Create the spoke virtual network


  1. From the Azure portal home page, select Create a resource.
  2. In Networking, select Virtual network.
  3. For Resource group, select FW-Hybrid-Test.
  4. For Name, type VNet-Spoke.
  5. For Region, select (US) East US.
  6. Select Next: IP Addresses.
  7. For IPv4 address space, delete the default address and type 10.6.0.0/16.
  8. Under Subnet name, select Add subnet.
  9. For Subnet name type SN-Workload.
  10. For Subnet address range, type 10.6.0.0/24.
  11. Select Add.
  12. Select Review + create.
  13. Select Create.

Create the firewall hub virtual network

 First, create the resource group to contain the resources for this tutorial:

  1. Sign in to the Azure portal at https://portal.azure.com.
  2. On the Azure portal home page, select Resource groups > Add.
  3. For Subscription, select your subscription.
  4. For Resource group name, type FW-Hybrid-Test.
  5. For Region, select (US) East US. All resources that you create later must be in the same location.
  6. Select Review + Create.
  7. Select Create.

Now, create the VNet:

 Note

The size of the AzureFirewallSubnet subnet is /26. For more information about the subnet size, see Azure Firewall FAQ.

  1. From the Azure portal home page, select Create a resource.
  2. Under Networking, select Virtual network.
  3. Select Create.
  4. For Resource group, select FW-Hybrid-Test.
  5. For Name, type VNet-hub.
  6. Select Next: IP Addresses.
  7. For IPv4 Address space, delete the default address and type 10.5.0.0/16.
  8. Under Subnet name, select Add subnet.
  9. For Subnet name type AzureFirewallSubnet. The firewall will be in this subnet, and the subnet name must be AzureFirewallSubnet.
  10. For Subnet address range, type 10.5.0.0/26.
  11. Select Add.
  12. Select Review + create.
  13. Select Create.

Tutorial: Deploy and configure Azure Firewall and policy in a hybrid network using the Azure portal

When you connect your on-premises network to an Azure virtual network to create a hybrid network, the ability to control access to your Azure network resources is an important part of an overall security plan.

You can use Azure Firewall and Firewall Policy to control network access in a hybrid network using rules that define allowed and denied network traffic.

For this tutorial, you create three virtual networks:

  • VNet-Hub - the firewall is in this virtual network.
  • VNet-Spoke - the spoke virtual network represents the workload located on Azure.
  • VNet-Onprem - The on-premises virtual network represents an on-premises network. In an actual deployment, it can be connected by either a VPN or ExpressRoute connection. For simplicity, this tutorial uses a VPN gateway connection, and an Azure-located virtual network is used to represent an on-premises network.


 If you  learn how to:

Monday, March 7, 2022

Install Docker

 Docker is a platform that enables you to combine an app plus its configuration and dependencies into a single, independently deployable unit called a container.


Download and install

You'll be asked to register for Docker Store before you can download the installer.

Get Docket for Window


After installing Docker, you may be asked to sign out to finalize installation.

Check that Docker is ready to use

Once you've installed, open a new command prompt and run the following command:

docker --version


If the command runs, displaying some version information, then Docker is successfully installed.


Thank you


Friday, March 4, 2022

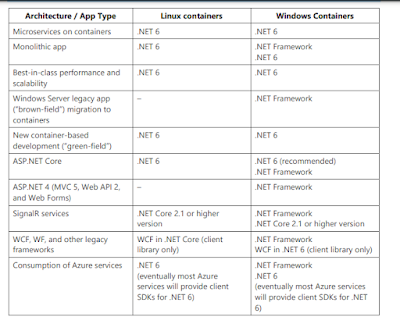
Decision table: .NET frameworks to use for Docker

 Decision table: .NET frameworks to use for Docker

The following decision table summarizes whether to use .NET Framework or .NET 6. Remember that for Linux containers, you need Linux-based Docker hosts (VMs or servers) and that for Windows Containers you need Windows Server based Docker hosts (VMs or servers).

Important Your development machines will run one Docker host, either Linux or Windows. Related microservices that you want to run and test together in one solution will all need to run on the same container platform


For Installation Docker Please Click here 

Wednesday, February 16, 2022

tsc.ps1 is not digitally signed error in typescript

 If you want to compile your typescript file  and getting blow error the solution for this error is below. 


Solution :- 

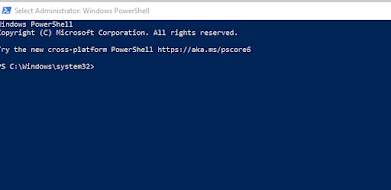
Open you PowerShell window in administrator mode.


You can run this in PowerShell command.

Set-ExecutionPolicy -ExecutionPolicy RemoteSigned


Thank you ! Hope it is help