Wednesday, September 7, 2022

Azure bastion


Introduction to Azure bastion

Microsoft Azure Bastion is a full platform managed service users can deploy on the cloud; this service lets users connect to the virtual machines using the Azure portal or browser. Azure bastion service is provided as part of a virtual network, and it provides secure and seamless RDP/SSH connectivity from the Azure portal to the Virtual Machines over TLS. Virtual machines do not need a public IP address, agent, or third-party software if we are using Azure Bastion for the connection. Azure bastion protects virtual machines from outside worlds as it hides RDP/SSH ports by providing secure access to RDP/SSH.

How does Azure bastion work?

Microsoft Azure bastion is not dependent on subscription/account or virtual machine as it is deployed as per virtual network. Virtual machines in the Virtual network use the RDP/SSH for connectivity when Azure bastion is provided in the virtual network. RDP and SSH are used as fundamental connection service to connect to the workload running in the azure. Exhibiting RDP or SSH ports over the internet is highly insecure, and this can be seen as a significant threat, and it frequently happens due to protocol vulnerabilities. To prevent a system from these threats and vulnerabilities, users can deploy the bastion hosts or jump-servers to the public side of the perimeter network. The bastion host server is mainly designed and configured to resist any attack. This server also provides RDP/SSH connectivity to the inside of the network and workloads used behind the bastion.

Azure bastion follows the below steps while deployment as describes in the diagram below:

  • Azure bastion hosts are migrated to the virtual network in virtual machines.
  • Using HTML5 browser user is connected to the Azure portal.
  • Users can select which virtual machines to connect to.
  • RDP/SSH session is opened in the browser with a single click in the Azure portal.
  • Azure VM does not use any public IP for connection.

How to create and use Azure Bastions?

Pre-requisites:

Before learning to create the Azure Boards, users must have an Azure subscription so that they can log in with valid credentials to the Azure Portal and create Azure Bastions.

Steps using Azure Portal :

Create the bastion host:

Step #1

Login into the Azure Portal using the below URL:

https://portal.azure.com/learn.docs.microsoft.com
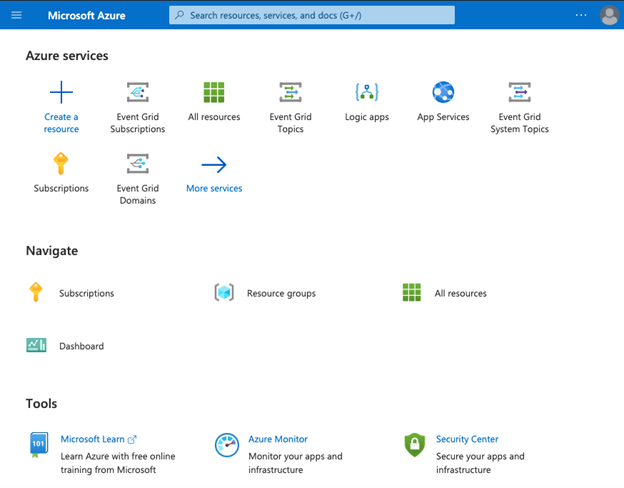
Azure bastion output 1

Step #2

From the Azure portal home page, select the +Create a resource.
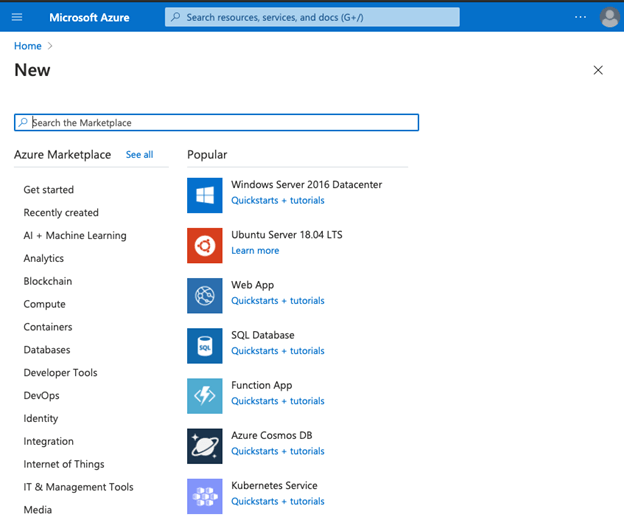
Azure bastion output 2

Step #3

In the Search field of Azure Marketplace, search for Bastion and click on enter to open the Bastion page:
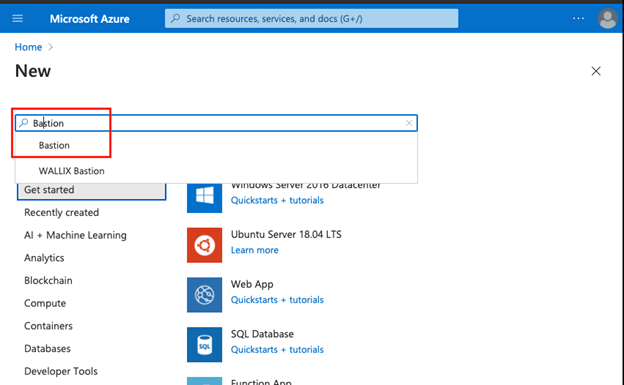
Azure bastion output 3

Step #4

From the Bastion page, select Create:
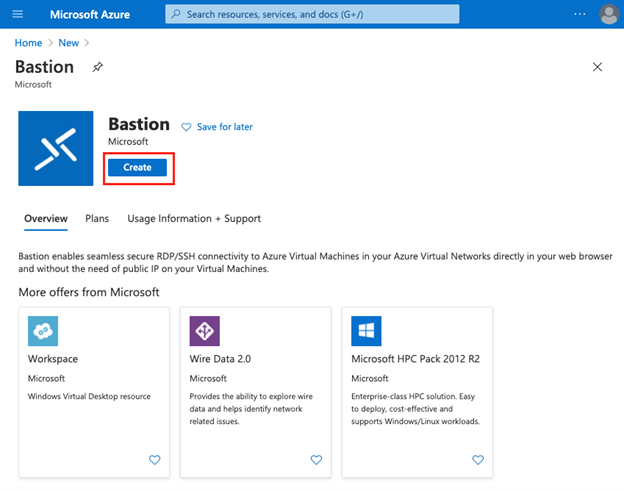
Azure bastion output 4

Step #5

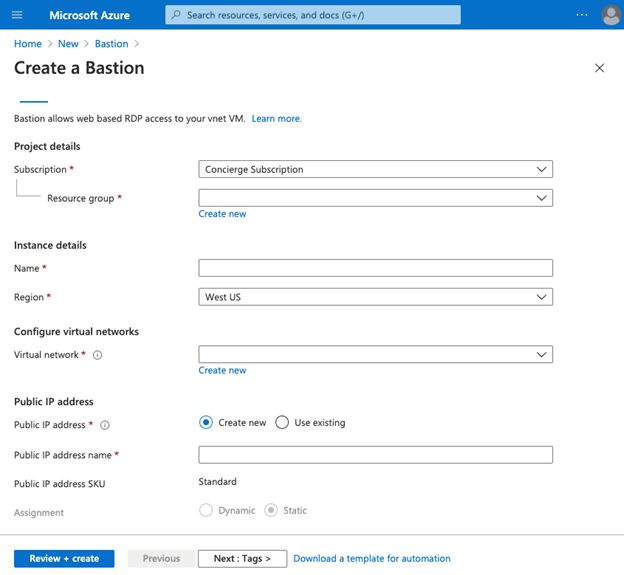
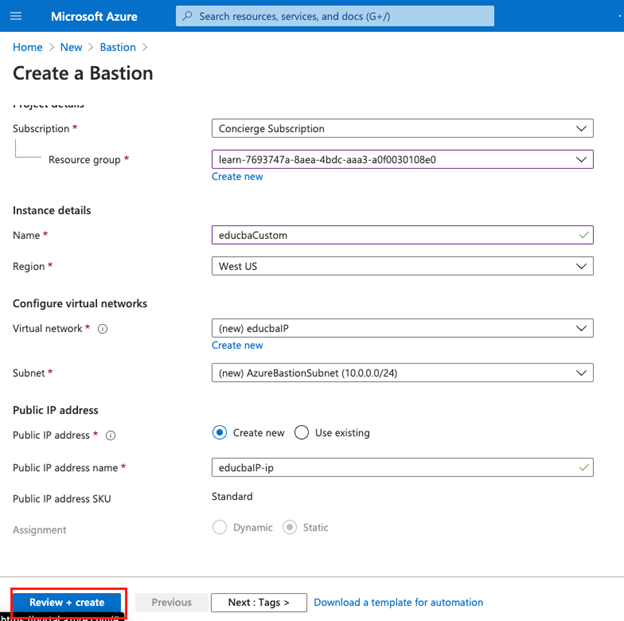
On a Create a Bastion page, enter the details as below:
Azure bastion output 5

Step #6

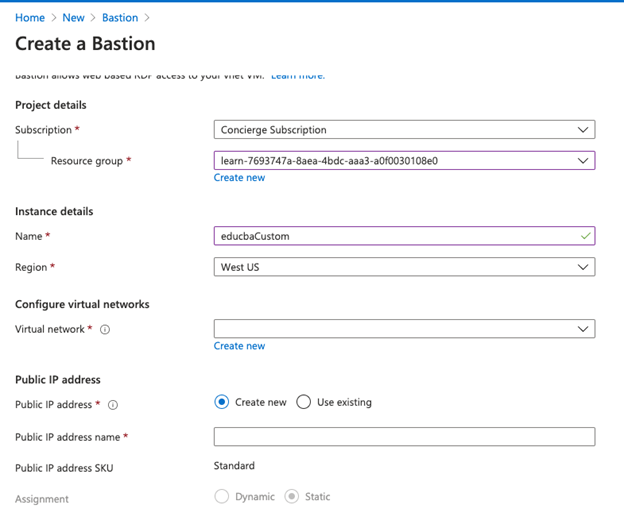
Enter the details of the new bastion as below:

Subscription: Select your subscribed plan from the drop-down list.

Resource group: Select the resource group in which you want to create bastion.

Name: Enter the unique name for the Bastion instance.

Virtual Network: Select a virtual network created in the location.

Public IP address: Select public ip address from existing or new.

Public IP address name: enter the name of the public ip address.
Azure bastion output 6

Step #7

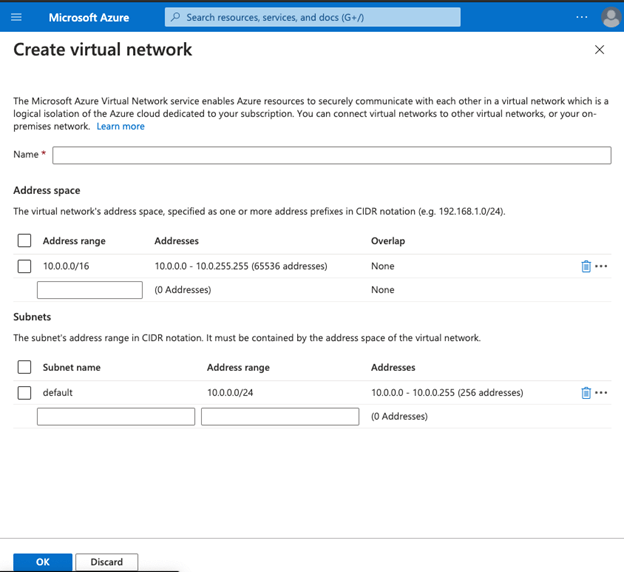
Select create new from the virtual network to create a new virtual network:
output 7

Step #8

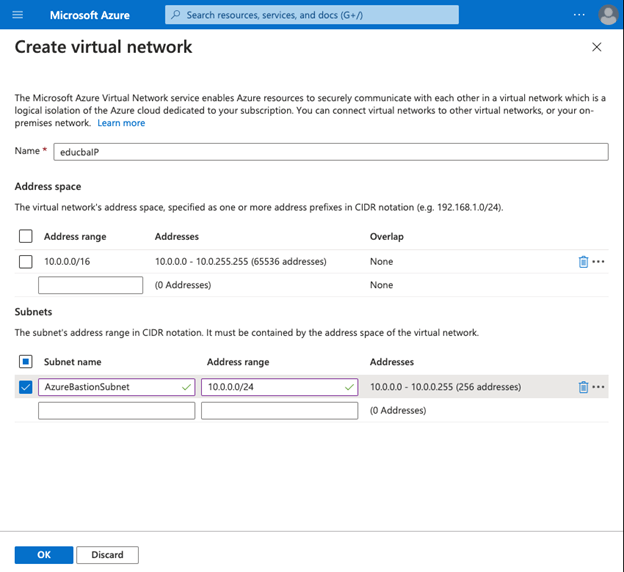
Click on OK from the create a virtual network:

  • In the subnet section, the subnet name should always start with AzureBastionSubnet.
output 8

Step #9

After specifying all the details and creating a new virtual network, select Review+Create from the page to validate details and then click on the create:
output 9

Step #10

Once the deployment is complete, the user can see the message that deployment is in progress/underway.

Azure bastion output 10

Step #11

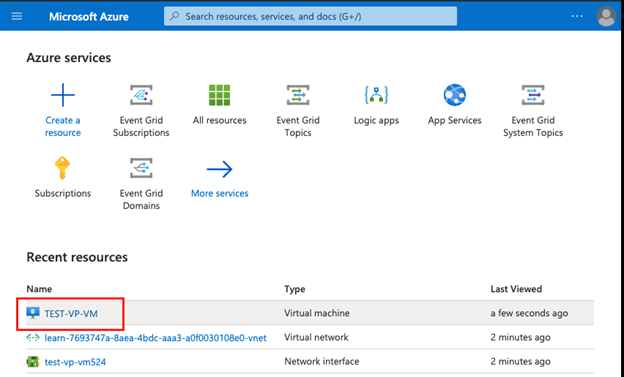
From the home page, check the newly create VM and open the Virtual Machine:
output 11

Step #12

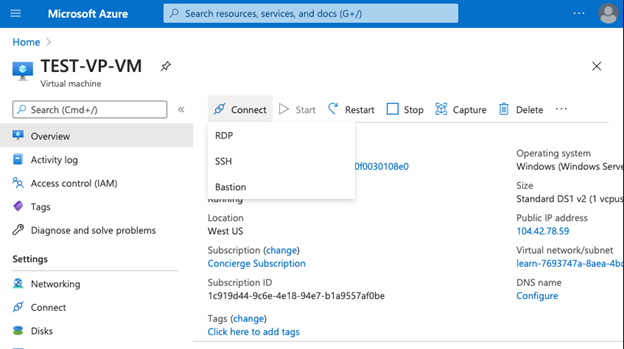
Select Connect from the virtual machine page:
output 12

Step #13

Select Bastion from the drop-down list:
output 13

Step #14

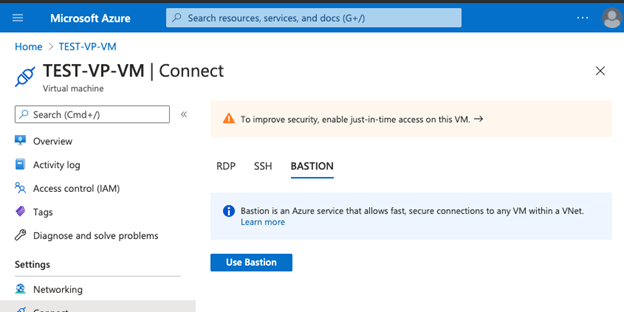
Select Use bastion from the page user will be asked to enter the username and password used to create a virtual machine, then click on the connect :
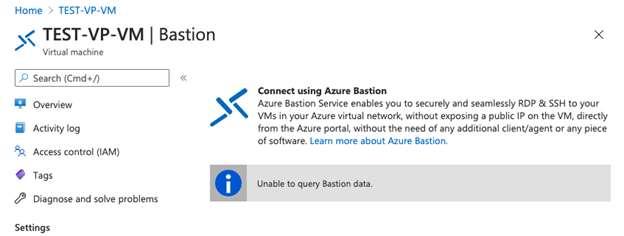
output 14

Step #15

This will open a virtual machine directly in the Azure portal.

Uses of  Azure Boards

  • RDP and SSH are directly integrated into the Azure portal and using a single click; users can have a seamless experience.
  • It uses HTML5 based web client, which helps to get RDP/SSH sessions over TLS on port 443, which helps to traverse in corporate firewalls securely.
  • Azure Virtual Machine does not need public IP while using Bastion.
  • It is a full platform managed service, and this protects against zero-day use using bastion, and it is always up to date.
  • Users do not need to apply any NSGs on the Azure bastion as the Azure bastion connects to the VM over private IP.

Notes:

In conclusion, Azure bastion helps users connect to the virtual machine over private IP and has in-built security offered due to RDP/SSH for connectivity. Due to the seamless integration of bastion with other Azure services, users can have to manage Azure bastion with a single click.

Thank you! Happy Learning.

Tuesday, September 6, 2022

Azure Boards


What are Microsoft Azure Boards?

Microsoft Azure board is a tool used for managing the work for software development and this tool is mainly used in Azure DevOps which helps to plan the work and daily activities for the team. All the work that needs to be done by the team is tracked in Azure boards and the Tailspin team will use Azure Board to get the most idea on the work which needs to be done and prioritize the work. Azure board also has extended support for the Scrum, Kanban, or customizable dashboards with support for integrated reporting.

Microsoft Azure board service helps users to track the software development work or the tasks associated with different users when a team of more than one developer or users are collaborating together. Below are most popular Process used to develop azure board are as below:

1. Basic Process

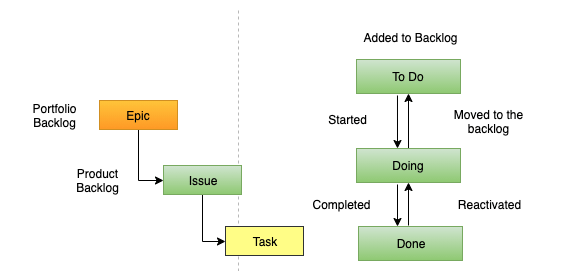
The basic process in the Azure board follows the work item hierarchy and workflow states. To track the work Issues and Tasks are created, For the larger scenarios all the tasks and work is grouped together and epic is created for the grouped work. Work status progresses from the not-started to completed and State workflow changes from To DoDoing to Done.

Work item is created by adding an issue, task, and epic to it. Epic was used to track features and requirements and issues were used to track user stories or bugs.

The below Image describe the basic process backlog work:

Azure boards 1

2. Agile Process

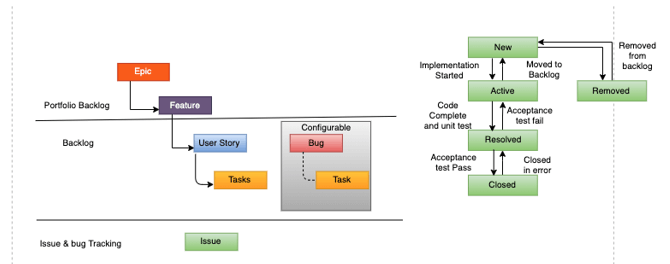
In agile processes, user stories and tasks are created in the work item and are used to track work or raise bugs and track the bug code and epics and features are used to collect the large scenarios in a single work task. As work progresses workflow status can be changed from New, Active, Resolved, and Closed.

Users can add a user story, bug, tasks, epic, and using this work item is created. Each team member will get assigned a user story based on a specific work team has to develop. In each story, tasks are created which are a smaller amount of work in a story to track the work done and working hours like track time in hours or day.

Azure boards 2

How to Create and Use Boards in Azure?

Pre-requisites:

Before learning to create the Azure Boards users must have an Azure subscription so that they can log in with valid credentials to the Azure Portal and create Azure Boards.

Steps using Azure Portal :

  • Create the Project

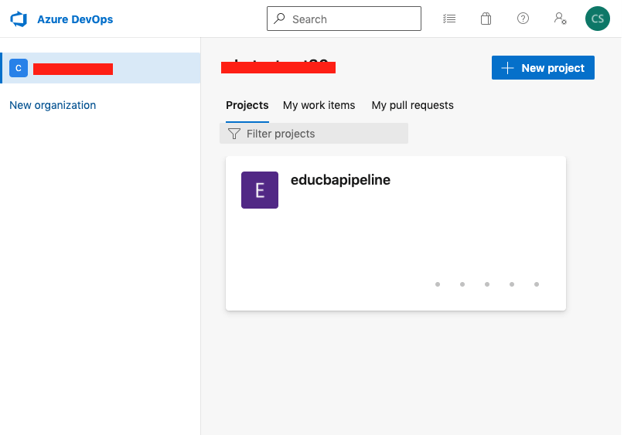
Step 1: Login into the dev.azure.com using the below URL:

https://dev.azure.com/

Azure boards 3

Step 2: Select +New project from the Azure DevOps:

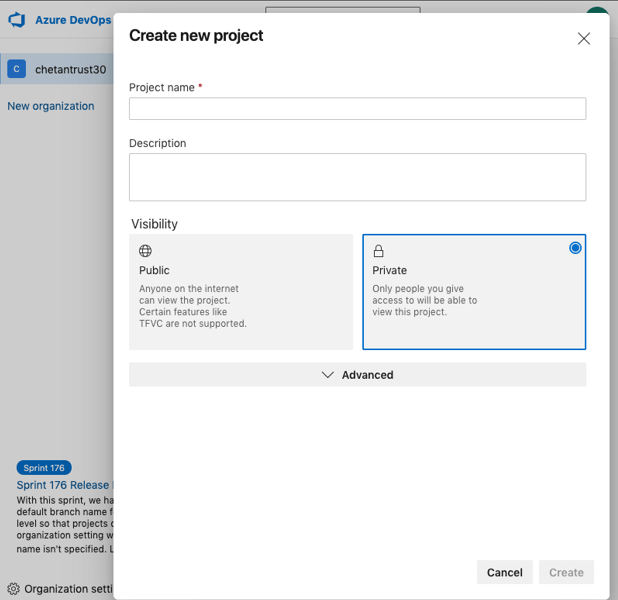
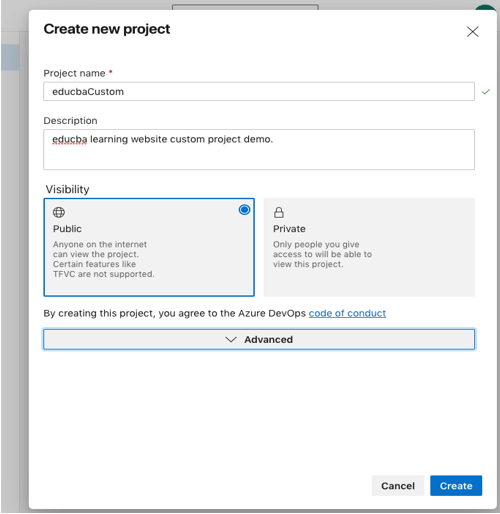
It will open a Dialog box with Create new project:

Azure boards 4

Step 3: In the create new project pop up window enter the below details:

  • Project name: In this field enter the name of the project.
  • Description: In this field enter the detail or description of the project
  • Visibility: Select either Public or Private to control the access permission and to choose whether to make the project private or public.

Azure boards 5

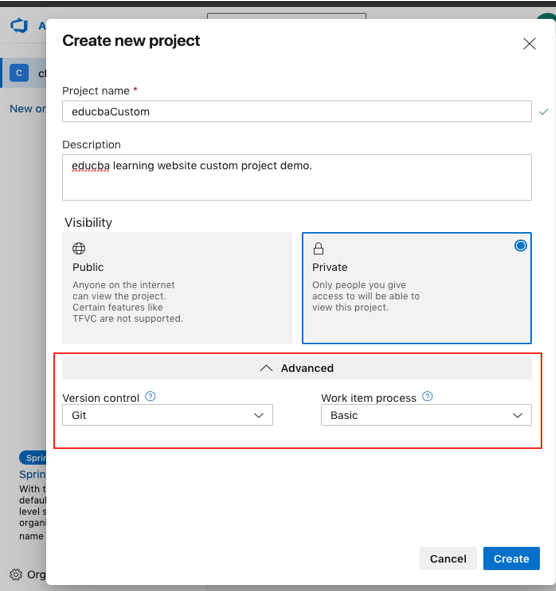
Step 4: Select the Advanced from the Create new project and under the Advanced drop-down select Version Control as Git and under work item process as Basic:

Microsoft Azure Boards 4

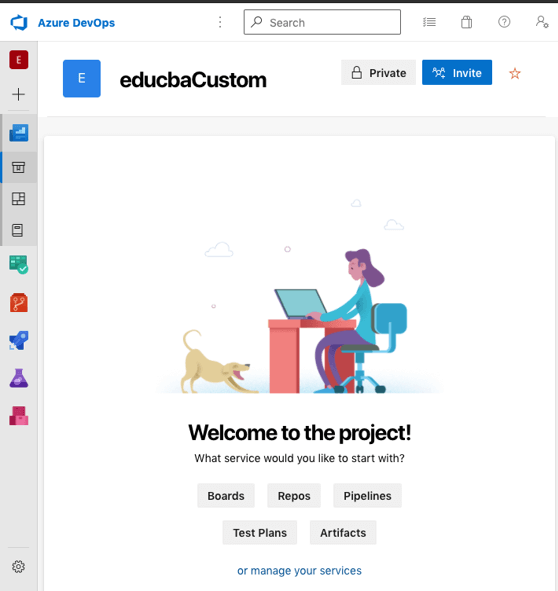
Step 5: Now select the Create to create a new project, After a moment a new project will be added.

Microsoft Azure Boards 5

  • Create Team and Add Team members

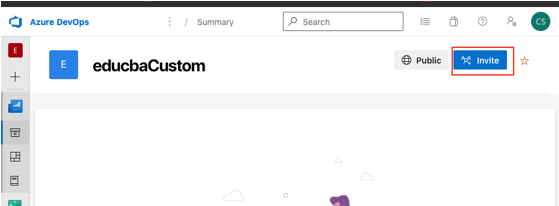
Step 6: Now to create a team click on the Invite from the Upper right corner of the project:

Microsoft Azure Boards 6

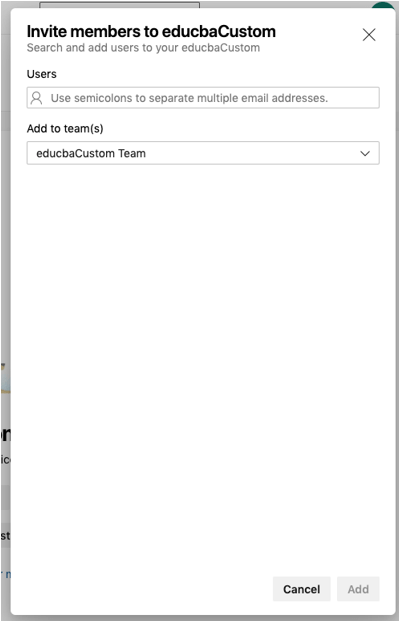
Step 7: Invite will open a dialog box to add new team members in the team:

step 7

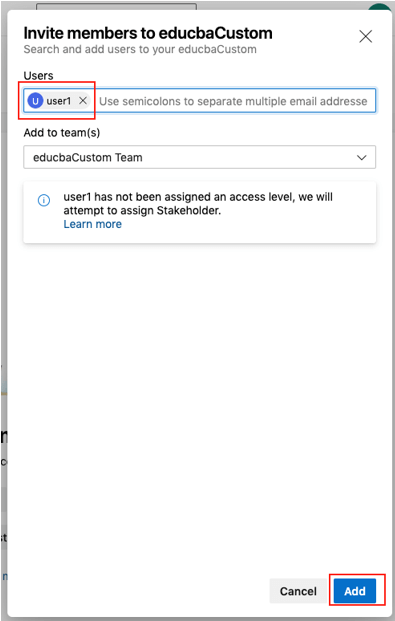
Step 8: Enter the user name in the users field and then select Add to add a new user:

step 8

Step 9: In the same way users can add as many as a user or team members needed.

  • Create the Board:

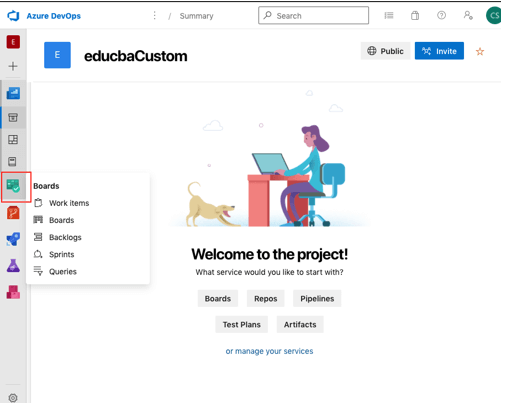
Step 10: From the project summary page select the Boards from the left sections:

step 9

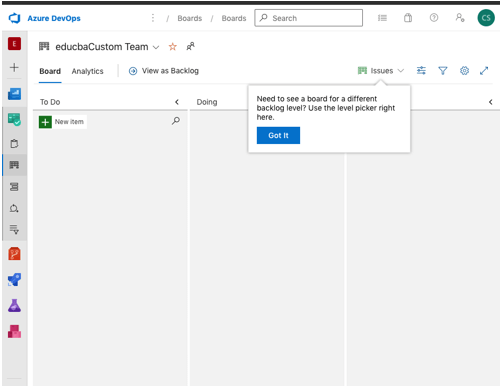
Step 11: Select the boards from the Boards list, this will open a blank board:

step 11

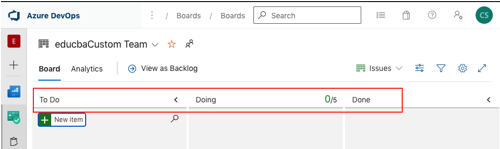
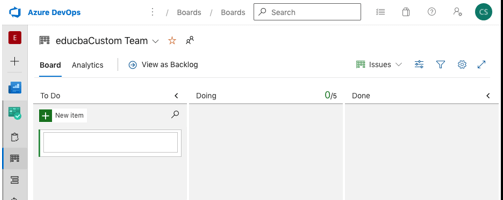
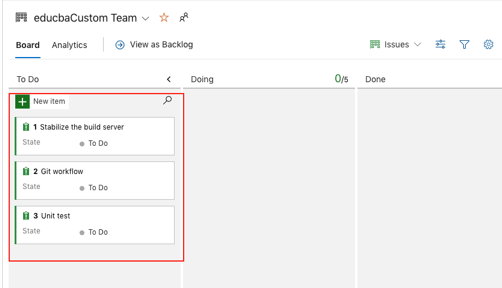
Step 12: As this is a Basic process we can see there is three status available To Do, Doing and Done:

step 12

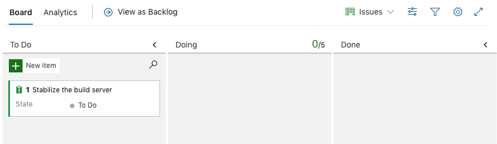
Step 13: From the To Do column select +New Item field and enter the item detail and click on the Enter:

step 13

Step 14: After entering the Enter new task is added with the task detail.

step 14

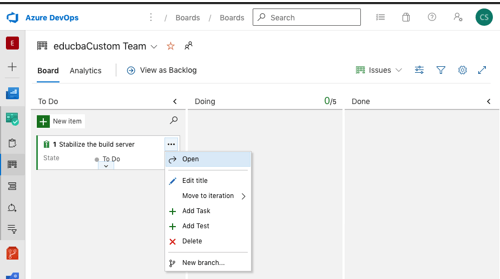
Step 15: Click on the new item created and then select the ellipsis (…) and then select Open:

 Microsoft Azure Boards 15

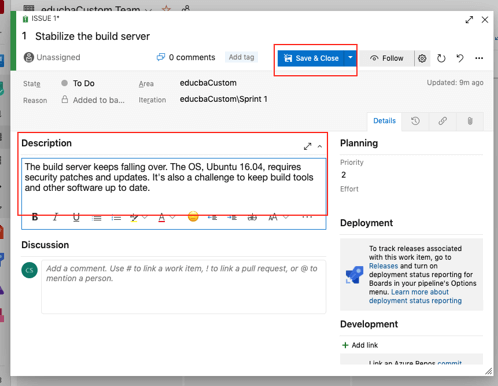
 Step 16: In the Description, field enters the description of the task and click on the Save :

 Microsoft Azure Boards 16

Step 17: Add some more items in the list, using above steps 13 to 16:

Microsoft Azure Boards 17

  • Define a Sprint

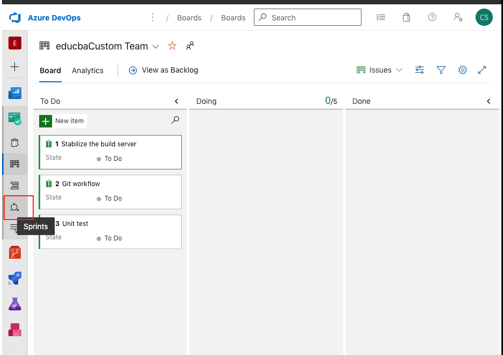
Step 18: from the board select the Sprint option from the left side of the page:

Microsoft Azure Boards 18

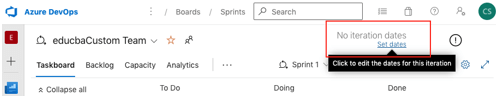
Step 19: Set dates of the sprint:

step 19

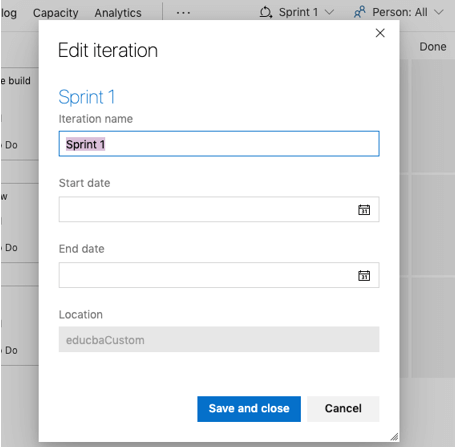
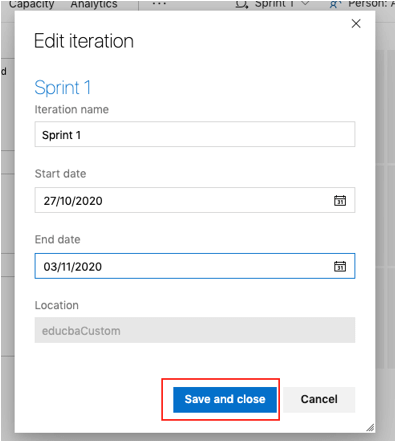
Enter the sprint detail:

Edit iteration

Step 20: Enter sprint iteration name and start and end date in the dialog box and click on the Save and Close:

Edit iteration 1

  •  Assign Tasks and Set Iterations

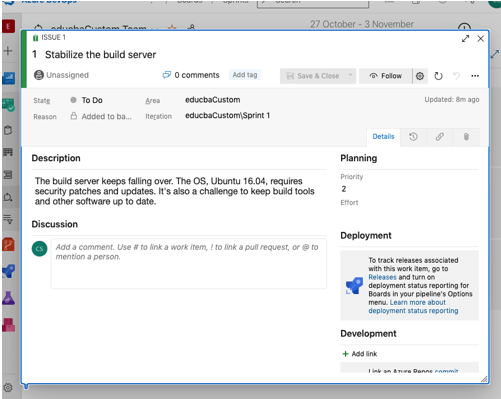
Step 21: from the Boards of the project select the Work items, in below screenshot I have selected the first work item created:

Edit iteration 2

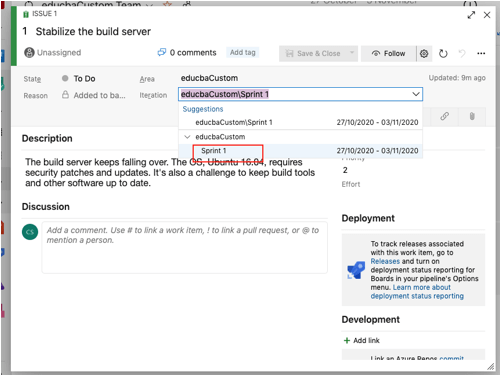
Step 22: Now from the iteration drop-down list select Sprint 1 from the iteration:

Edit iteration 3

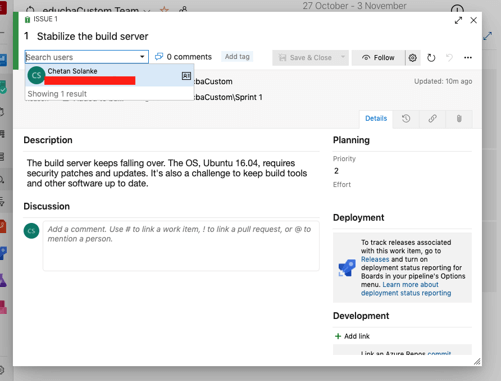
Step 23: Now select the Unassigned from the page and assign a task to the existing user and then click on the Save & Close:

Edit iteration 4

Step 24: In the Boards, user can check task is assigned to the new user:

Edit iteration 5

Step 25: Repeat the same steps 20 to 23 again for the remaining work items.

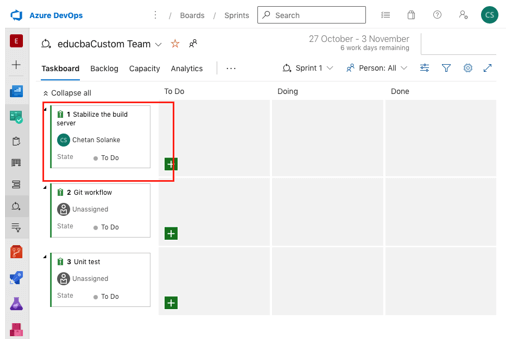
Here we can see that a new Azure board is created and a newsprint story is added.

Uses of Azure Boards

  • Azure Boards allows cross-team and teams to collaborate and work together on single development tasks or work.
  • Azure board has support to the Microsoft Teams, Skype, and Slack so that agile team members can collaborate more effectively.
  • Azure Marketplace integrated with an azure board which provides more tools to the users and team to use so that this extension can support planning and tracking.
  • Azure board is connected to GitHub so that issues and tasks in Azure boards are linked to the GitHub commit.
  • Work is organized into the grouping issues/tasks under the epics and also users can create triage issues and tasks quickly with ease.

Conclusion

In conclusion, Azure Boards has support for the Basic and Agile processes. Agile methodology is the most used software development method. Also, it has support for various Microsoft Azure cloud services which helps teams to develop applications with ease.

Thank you! Happy Learning.
Azure Elasticsearch


Introduction to Azure Elasticsearch

Elastic cloud is coupled directly to the platform of Azure to provide the strength of elastic stack that includes all the solutions for security, enterprise search, and observability. The user should manage the business with standard maintenance. It offers managed services and helps the user in innovating ideas. Moreover, the user can avail of open-source solutions to manage the software license and elastic software products. The creation, management of Azure Elasticsearch is briefly discussed in this article.

What is Azure Elasticsearch?

Elastic cloud provides access to Elasticsearch, which is used as a software as a service and has many reliable features for subscriptions of Elastic stack and services like training, consulting, and consultative tech support. The clusters of Elasticseach are deployed on an elastic stack which includes the user to access Logstash, Kibana, and the entire Elasticsearch in an entirely automated way. It offers an attractive user interface that assists the user in feeding the input to the template of the Azure resource manager and deploy the required sources to the concerned group. The Azure resource manager can be accessed independently via the Azure portal of command-line interface or command-line tools of Azure Powershell.

Create Azure Elasticsearch

Create an account in the marketplace portal of Azure. In the search window, type Elasticsearch. Once found, click and give create option.

In the basic window, provide a username to access the virtual machine and for authentication, choose a password or provide a secure socket shell.

Choose the resource group, subscription, and location where all the solution needs to be deployed.

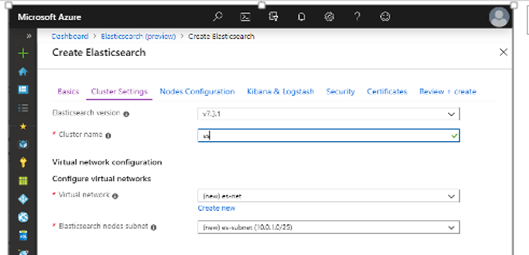
In the cluster settings tab, choose the preferred version of Elasticsearch and give the name to the cluster.

Azure Elasticsearch output 1

Then give the VNet, or you can use the existing one. If networking resources are present in the resource group and the user to access the cluster resources on a similar network, he can deploy it in the existing virtual network.

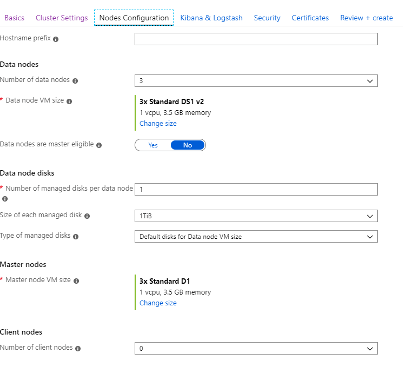
The configuration nodes tab is used to define the number of nodes for every type of cluster. The user can give the type, size, and several disks for every data node. If there are multiple disks, the system will create a RAID 0 array to enhance the system performance.

Azure Elasticsearch output 2

Then go to the Logstash and Kibana tab, the user has to define the access to cluster from the external virtual network.

Kibana has to deploy the individual virtual machine with a distinct security group and public IP address. It can be accessed using ports 22 and 5601 over TCP. Logstash can be installed by another separate VM, which is deployed in the availability set. The user can customize it by using additional plugins and configuration files.

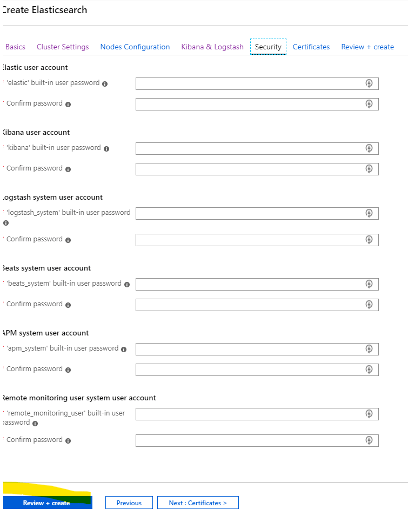
The role configuration and users are configured in the security tab, but it is available at a trial period of 30 days that the Azure Marketplace provides. The mandatory eight tabs that need to be filled by the user are Elastic user account, Kibana user account, Logstash system account, beats account, APM system account, and remote monitoring account.

Click on the review and choose to create. Hence the ELasticsearch is created successfully.

 output 3

Azure Elasticsearch Managing

The required Azure resources executed on the cluster of the Elasticsearch need an API for the resource manager of Azure. This API is an infrastructure as a code that deploys the resource as an Infrastructure as a service within the azure environment with the help of consistent API. The template of ARM is given by Elasticsearch, which can build resources required for the cluster Elasticsearch. It can be incremental deployment besieged at the Azure resource group with the pre-defined workload of elasticsearch that replaces the resources which are deployed currently.

Architecture azure Elasticsearch

The architecture of Elasticsearch is described as follows. The important components are data nodes, master nodes, coordinating nodes, incremental deployment, and machine learning nodes.

  • Data nodes: There are three nodes in the default template. They are virtual machines that perform an aggregate, search, and other data-oriented operations that associate with the load balancers placed in the backend.
  • Master nodes: Here, the master eligible parameter is fixed to no in the data nodes, which signifies that those nodes cannot be chosen as master nodes. This system will build three dedicated masters and be recommended for bigger clusters.
  • Coordinating nodes: Using this node, the cluster can deploy a hundred and more data nodes, which can be a coordinating node that can be added to help the incoming request sent from clients to data nodes, and results are aggregated.
  • Machine learning nodes: In these nodes, the deployed node function are called ingest nodes. It can be used dually as machine learning nodes if the machine learning feature is included in the license of the Elasticsearch.
  • Incremental deployment: In default, this template is used as an incremental deployment model, which signifies the existing Elasticsearch resources in the concerned resource group where the settings are not modified by any template and remain the same. The new resources for which the template has different settings can be added or modified. The deployment scripts update the elasticsearch.yml file, and if the temporary disks avail the node, it can be updated in the permission and data directory.

How Do You Connect to Elasticsearch?

Inside Azure, the virtual network can be connected, which is comprised of the desired cluster via the internal load balancer. It is made by round-robin requests that can be linked directly to the data nodes or sometimes to the coordinating nodes if deployed. It can be accessed to Azure externally using an external load balancer configured with an external access tab in the configuration in the external access tab.

Conclusion

The developer team accessed the Azure to embed the search for websites, applications, metrics, APM, infrastructure alerting, logging, rich BI, and security analytics in the client-developed customized applications. For example, the business analyst needs real-time insight with KPI to share and create reports in a single location with Elastic stack.


Thank you ! Happy Learning