Thursday, May 24, 2018

Configure One-to-Many Relationships in EF 6 using the code-first approach.

Here, we will learn how to configure One-to-Many relationships between two entities (domain classes) in Entity Framework 6.x using the code-first approach.Let's configure a one-to-many relationship between the following Order and Customer entities where there can be many students in one grade.

public class Order
{
    public int OrderId { get; set; }
    
}
       
public class Customer 
{
    public int CustomerId { get; set; }
    public string CustomerName { get; set; }
    
}
The one-to-many relationship can be configured in the following ways.
  1. By following Conventions
  2. By using Fluent API Configurations
In this topi i will cover only Conventions Part.

Convention 1:

We want to establish a one-to-many relationship between the Order and Customer entities where many students are associated with one Customer. It means that each Order entity points to a Customer. This can be achieved by including a reference navigation property of type Customer in the Order entity class, as shown below.
public class Order
{
    public int OrderId { get; set; }    
    public Customer Customer { get; set; }
}

public class Customer
{
    public int CustomerId { get; set; }
    public string CustomerName { get; set; }
    
}
In the above example, the Order class includes a reference navigation property of Customer class. So, there can be many Orders in a single Customer. This will result in a one-to-many relationship between the Order and Customer table in the database.

Convention 2:

Another convention is to include a collection navigation property in the principal entity as shown below.

public class Order
{
    public int OrderId { get; set; }
    
}

public class Customer
{
    public int CustomerId { get; set; }
    public string CustomerName { get; set; }
    
    public ICollection<Order> Orders { get; set; } 
}

In the above example, the Customer entity includes a collection navigation property of type ICollection<Order>. This also results in a one-to-many relationship between the Order and Customer entities. 

Tuesday, May 15, 2018

Create Web API Service In asp.net

"ASP.NET Web API is a framework that simplifies the creation of HTTP services".
Using ASP.NET Web API, we can create HTTP services that are non-SOAP based like plain XML or JSON strings, etc. with added advantages.

1. Create Web API Project

  • Open Visual Studio and create "New Project", i.e., File -> New Project.
  • Choose "ASP.NET Web Application" template and name project as "AS You Want". ASP.NET Web Application, we have multiple sub-options, i.e., Empty, Internet Application, Web API, etc.
  • Choose "Web API" and Check on Web API and simply press "OK" button.

Note :- If you select a default ASP.NET Web API template project is created. As it is an MVC application template, you will easily find "Model", "View" and "Controller" folders inside it.

2. Preparing Domain Model

Now in a second step, we need to prepare the model.
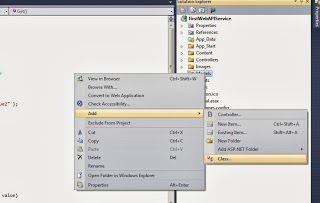
  • Right click on the "Model" folder and choose "Class" under "Add" from the context menu as shown in the figure.
  • Name the class as "Product.cs".
Here is the code for Product class:
public class Product
{
    public int ProductID { get; set; }
    public string ProductName { get; set; }
    public string ProductCategory { get; set; }
    public int Price { get; set; }
}

3. Adding Controller Class

Controller class plays an important role, because request coming from client hits the controller first. Then the controller decides which model to use to serve the incoming request. So, in order to add a controller:
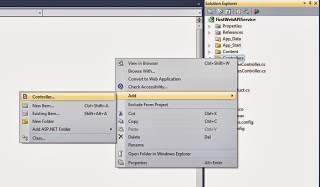
  • Right click on the "Controller" folder and choose "Controller" under "Add" from the context menu as shown in figure.
  • Name the controller as "ProductsController".
  • Click the "Add" button, a new controller class will be added.
In order to make things simple, we will load the model with data inside this controller instead of loading it from database. Following is the code for controller class.
public class ProductsController : ApiController
{
        Product[] products = new Product[]
         {
             new Product { ProductID = 1, ProductName = "Product 1", 
                           ProductCategory= "Category 1", Price = 120 },
             new Product { ProductID = 2, ProductName = "Product 2", 
                           ProductCategory= "Category 1", Price = 100 },
             new Product { ProductID = 3, ProductName = "Product 3", 
                           ProductCategory= "Category 2", Price = 150 },
             new Product { ProductID = 4, ProductName = "Product 4", 
                           ProductCategory= "Category 3", Price = 90 }
         };
        public IEnumerable<Product> GetProducts()
        {
            return products;
        }
}
Don't forget to add "using FirstWebAPIService.Models;" at the top of the controller class.
Now, it's time to test your HTTP service using ASP.NET MVC Web API.
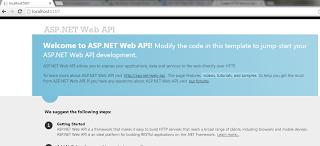
Run the application by pressing "CTRL+F5", Welcome window will appear as follows:
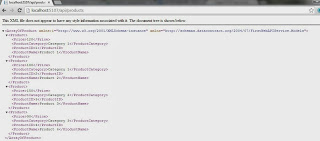
In order to call our Product controller, change the URL as "http://localhost:XXXX/api/products". You will see the results as shown in the following output window.
Final output returned can be displayed differently by different browsers.


Thank you to your valuable Time 

See You Take Care........................... 


Monday, May 14, 2018

Error in swagger Swagger/ui/index or http://localhost:57928/swagger/docs/v1


When you access to the swagger url: http://localhost:28483/swagger/ui/index, it generates this error:
500 : undefined http://localhost:28483/swagger/docs/v1


Solution:-

Open swagger configs. Go to App_Start\SwaggerConfig.cs file and under EnableSwagger lambda expression add this line:


c.SchemaId(x => x.FullName);

Full code is like this:
GlobalConfiguration.Configuration 
    .EnableSwagger(c =>
    {
        // your configs...

        c.SchemaId(x => x.FullName);

        // other configs...
    })
    .EnableSwaggerUi(c =>
        // ....
    });

Using this i thing problem will be resolve 

Thank you.